2015-06-30

Rebuilding a cheap table saw part #6

After the saw blade was finally in line with the top, we decided to make the base first, before routing out the miter slots and making the fence. As we are on a zero budget is was all about using the materials that are on hand. So, we used 2 off cuts of pine and the base material that came with the saw. We used the extension tops as supports, the steel profiles were combined and screwed together in a "creative" way. The base, which is a part of our existing worktable, turned out well.

The extension tops that came out the box were used as a part of the base. The (black painted) pine off cut pieces are an extra support, mounted right on top of the wheels of our worktable.


The steel profiles that came with the saw were modified and used to make 2 legs and some bracing supports. Next thing is to make a box (under the saw) for the sawdust.

The top is 1 cm higher than the work table. We don't have to put the miter-slots in the worktable itself and our problem of sometimes hitting some parts of the other table saw (that's in the worktable for cross-cuts)

The last problem to solve will be the zero insert plate...

2015-06-27

Rebuilding a cheap table saw part #5

It took a whole day to adjust the alignment of the saw blade. It just didn't work with the available adjusters that are on the machine itself. A big part of that problem is the very thin sheet-metal the housing is made off. It bends with every nut you tighten. In the end I made an extra "micro" adjusting system and added it to the "leveling" bar that runs across the saw blade. It did cost me a few extra millimeters in height, but who cares, better a good alignment than getting frustrated every time you use it.

Chiseled out some more space for the adjustment bar, although every thing was fitting nicely after that, it turned out not to be very accurately adjustable.

So I came up with an extra way of guiding the bar. This seems to do the job. However it make the saw blade rise 3 millimeter less, so now we only have lust over 60 mm instead of the original 68 mm 


And see here... a perfect alignment. finally! 

The old saw needed a channel at the back to tighten the fence. 

The new fence is going to be made after an example of Mathias Wandel (end some others on Youtube) so the whole side of the worktable can be removed. 

Starting to look like a real table saw after all... 


Next problems to be solved are the hinges that I want to incorporate to the top. I want it to be able to lift when adjustments need to be done. We also have to come up with a solution for the zero clearence plate...I can only router out 2 millimeter... so what material would be strong enough... I'll sleep on it.

2015-06-26

Rebuilding a cheap table saw part #4

It didn't even take 2 Euro's to get 20 new M6x30 bolts. All parts were ready to be assembled and all went well until we came to the nuts underneath the lifting/tilting bracket. It took a few hours, all kinds of tools, tape, and a few #**%+$$'s if you know what I mean, but finally I managed to get it all sorted out, I thought.

I didn't know at the time why there were nuts on one side of the connection bolts for the tilting/lifting bracket. After I put it on all became clear.

The last hole I had to drill was the one that lines up the saw blade... I didn't do it exactly right as I would find out later. 

It wouldn't be until I fitted everything in, that I realized I didn't router out enough for the adjusting clip (above on the picture) it should be able to move a bit (a millimeter) to the right.... 


Photo taken from the other side. As you can see, there's room in the clip to move a bit back.... if I only had routed out a few millimeter more... 

The result of that missing millimeter... 

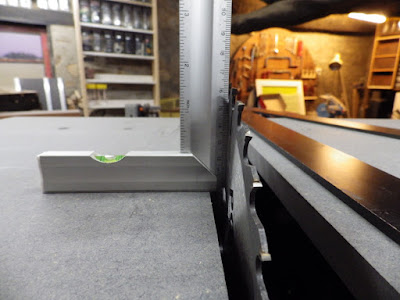
Getting the blade 90 degrees vertical wasn't that much work. There's a special bolt in the tilting bracket that is adjustable. 

Instead of 68 millimeter, the height of the blade is now 63, the loss for making a better top. I certainly can live with that.

Question now is; do I take the whole thing apart again to router out that 1 millimeter, or am I just going to try it with a chisel....(at place that's hard to reach). I will sleep om it....

2015-06-25

Rebuilding a cheap table saw part #3

The 2 sheets of hdf are glued and screwed together. There's an extra strip of 4 cm. under the front for the t-style fence (inspired by Mathias Wandel) with some alterations probably.

After the sheets were glued and screwed together I realized that I will need to make a firm frame. This top becomes heavy! 

The original top "on top" of the other... . 

The difference between the old and the new... 

Kind of looks smooth and smart doesn't it...

and so an other problem needs a solution..


The original "zero clearance" insert is just a few milliliters from one of the bolts that holds the motor. 

After putting the housing of the saw on the top... I realized I could not reach the bolts that are hanging the tilting / lifting mechanism to the top, so yes, I had to take it apart again.

After putting the holding plates in like on the original it turned out that the blots are to short due to the 5 millimeter extra thickness. We are going to have to buy 5 new ones, well when that turns out to be all, we'll be happy!

2015-06-23

Rebuilding a cheap table saw part #2

Now that was much more routing time that I thought. Because of the 2 sheets of HDF, I had to transfer the first layout to the second, only without some of the "out-cuts" trying to keep as much thickness as possible.

Keeping as much material as possible...
Luckily this cheap saw is adjustable in all directions, all nuts and bolts...
Only problem so far is the knife.. But I guess I will adjust that (make it smaller) because making the cut-out to change the saw blade bigger means less strength. 

And now it's all about little adjustments to get the new top on to this 1 millimeter thick "steel"..
Maybe that's something to make a bit stronger to..
Routing and grey HDF... not a good combination if you want to keep your workshop clean...


2015-06-18

Rebuilding a cheap table saw part #1

It looks like every good thing comes with a bad thing at Not Just Sawdust. The good thing was that we found very nice mahogany and beech for some Recycled Box Guitars and Cavaquinho's that we make at Triple Chaos. The bad thing was that the table saw, we bought about a year ago, exploded. Yes, the bearings came flying out. As we are on a very low budget, the only option was buying a cheap table saw again. This time we didn't look for the best one in the lowest range but the one that was most easy to take apart. The one we got was completely put together with bolts and nuts, no welding...

The top came bend and warped out of the box. Didn't bother us were not going to use it anyway.

The top is going to be made out of a sandwich of 19mm and 17mm hdf, the same material as the worktable. We are really impressed how it holds up, so it seems a good choice. Our local furniture maker is always prepared to help although he was a bit surprised when we showed up with a cutting list...
We made sure he realized that all had to be at a 90 degree angle and when we came the next day to collect, all was nicely cut to size. We used some spray-paint to mark the holes that we have to drill. 

Hole marks in the right place...

punctured in the middle.. (we hope)

The plastic insert plate that came with the saw is a joke... and we measured the thickness of the old top, 1 millimeter but there were nuts in between the saw mounting and the blade, which makes a total of 7 mm.

The top will be routed out about 9 mm, so the new top will be 1 cm thick at the weakest points, but will be supported by the second plate of 17mm that will be glued on to it, and will be a bit longer than the top one, to make a grove for the fence.

part #2: routing and finishing the top.


2015-06-01

The World of Woodworking #2

Sometimes you just come across a documentary or short video on the world wide web that really gets your attention. In The World of Woodworking we will share these beautiful images from artists all over the world. A new month... so 3 new portrait's of special woodworkers.